|
Stanley Lewis was a Jewish-Canadian sculptor, printmaker, photographer, and internationally renowned art teacher who was born in Montreal, Quebec in 1930. He attended an art school at the Montreal Museum of Fine Arts and studied under the Group of Seven artist, Arthur Lismer and Canadian artist and art educator, Jacques De Tonnancour. He was ranked first in his class and graduated with an Honours diploma in graphics, design, and sculpture. He gained the opportunity to continue postgraduate education in Mexico at the workshop of Vittorio Gambacciani, a Master Florentine marble sculptor and then in Israel at the Ein Hod Artists Colony. He travelled to Florence and studied Michelangelo’s sculptures and then returned to Montreal where his studio became an artistic hub for many artists in the Montreal art community and the Jewish neighbourhood. Lewis taught at the Montreal Museum of Fine Arts and became the head of the sculpture department at the Saidye Bronfman Center School of the Fine Arts. Even at the age of 76, he was still creating sculptures until a few months before his death in 2006. Since 1950, his sculptures and lithographic works have been displayed in museums and galleries around the world. His works have been collected by the Montreal Museum of Fine Arts, the Musée national des beaux-arts du Québec, the National Gallery of Canada, and the Art Gallery of Algoma. Stanley Lewis is most known for his sculpture works, having studied under master of marble sculpting Vittorio Gambacciani in Florence. During his studies in Florence, he also aided Irving Stone, the American writer, in understanding the various techniques in sculpting, specifically those of Michelangelo. This led to the collaboration on the novel The Agony and the Ecstasy, which explored the life and work of Michelangelo. Lewis was also known as a pioneer in coloured lithography in Canada. He used multiple stones to layer various transparent ink to create smoother transitions in the prints After returning to Canada from Florence, Lewis travelled to the Canadian artic drawn in by his interest in Inuit Sculptures. During his many winter visits to the North, Lewis was inspired by the stone carving technique he learned and began making stone cut prints. |
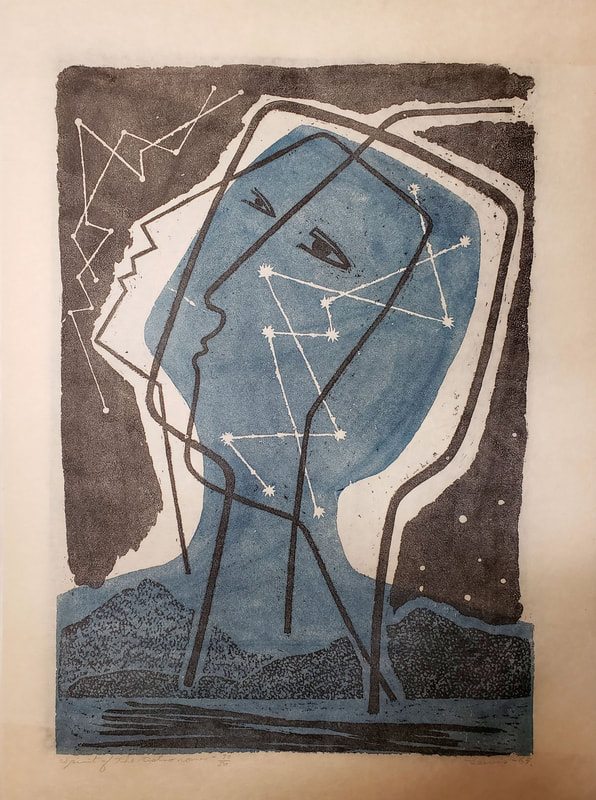
Lewis, Stanley (Canadian, 1930-2006). Spirit of the Astronomer, 1964
Lithograph on paper
61 x 46. Collection of the Art Gallery of Algoma; Guy Gagnon
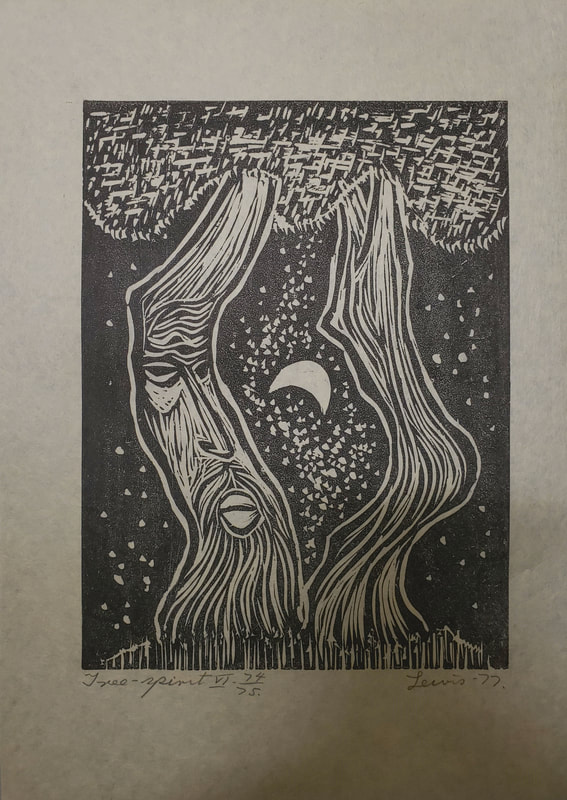
Lewis, Stanley (Canadian, 1930-2006). Tree Spirit VI, 1977 Lithograph on paper 43 x 30. Collection of the Art Gallery of Algoma; Guy Gagnon
|
|
|
GET INSPIRED
Get Inspired by
Try this creative activity based on the artwork!
Stanley Lewis’s visits to Arctic Canada lead him to begin stone cut printing, a type of relief style print. Try your hand at a relief type print using recycled Styrofoam!
SUPPLIES
- Pencil
- Marker- Permanent markers are ideal
- Styrofoam - Can come from a Styrofoam tray or plate but needs to be flat and clean.
- Paper - need to be slightly larger than your Styrofoam
- Acrylic paint
- Foam roller or foam brush
INSTRUCTIONS
- Start by thinking about what kind of image you would like to print. There are a couple things you will want to keep in mind with your image: Your image should be a simple line drawing, you don't want shading or something too complicated as it will be harder to carve into the styrofoam an your image will also print backwards, so don’t put words in your image or make sure to write them backwards on your styrofoam. You can start out with some scrap paper and practice your drawing for your print.
- Once you've decided on your image take your clean styrofoam and cut it to the size you want your print to be. Make sure you have a big enough flat surface to draw your image onto. Be careful not to bend or dent your styrofoam as these marks will show up on your print.
- Use a permanent marker to draw your design onto the styrofoam, don’t forget that your image will print in reverse!
- Once you have your image drawn on the plate you will want to start to ‘carve’ the plate. To do this you will use a pencil that has a dull or rounded point. Start to trace the design you drew with the pencil, pushing into the Styrofoam gently – it is easier to start gently and slowly create the indents in the Styrofoam than to push to hard – which can make it harder to draw the design and/or break the Styrofoam plate.
- Go over your image a couple of times to make sure the image is deep enough.
- Once the design has been ‘carved’ into the Styrofoam you can begin to print. Using a foam roller roll up paint onto the whole roller – the paint should cover the roller but not be super saturated or gloopy. If using foam brushes it's particularly important to make sure there is not an excess of paint on before applying it to the Styrofoam.
- Lightly roll or brush the paint onto the Styrofoam, this needs to be done carefully so that you are not pushing paint into the lines of your image.
- You will have to work fast again once the paint is applied to the Styrofoam. Before the paint dries, quickly take a piece of paper and lay it on top of the image, rubbing the back with your hand to transfer the paint to the paper. Gently remove the paper pulling from one of the corners and hang your print to dry or let it dry flat.
- When you are done printing or if you want to print in a different colour, wash off your Styrofoam to be able to use it again at another time.
Don’t forget, there are no mistakes in art! Be bold and have fun!
|
|
Share your inspired work with us!
Send us an e-mail with your name, photo of your work and the activity it was inspired by and it could be posted on our website!
Please be aware that whatever is posted is widely accessible. The AGA is not responsible for the copyright and has no control of what people will do with the posts.
Please send you submission to: [email protected]
Please be aware that whatever is posted is widely accessible. The AGA is not responsible for the copyright and has no control of what people will do with the posts.
Please send you submission to: [email protected]